K&N Air Intake
Intake:
Before and After
Last Update:
(No more content updates will be made)
[Back to PGT Main Page]
Go to cost analysis
This page/link has been made obsolete! When the weather is good, I'll use the Hotshot Cold Air intake. Go to that link instead. When the weather is bad, I'll use the stock airbox. This project is no more!
I finished the air filter setup the way I want it for the moment. Final images have been posted.
BEFORE:
Here's a .wav file of the intake before any mods are done. The microphone was placed beneath the hood by the battery and was quite loud, so the .wav was modified slightly by reducing the amplitude so it's kinder on sound systems (i.e. normalized 65%). Top speed achieved was around 70mph at the bottom of 3rd on a deserted stretch of road.
Stock Airbox
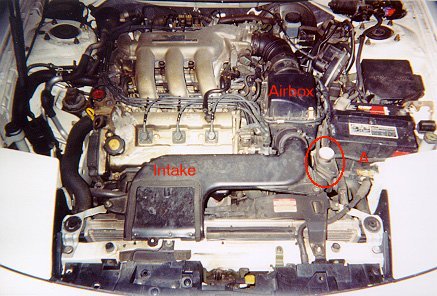
The A refers to the rubber hose that was cut in half during the relocation described in the text below. The item circled in red is the radiator filler cap. This had to be relocated. The Intake and the Airbox are the items removed in the install of the cone filter.
AFTER:
At this stage of development, the ram air box is complete. I used a 3" dryer duct and an ABS catch basin (Which, I should mention, was incorrectly identified as a water drain tank by a fellow Prober who shall not be named but his initials are TW ;]). I took some pictures and will scan them in soon.
Modified Ram Air
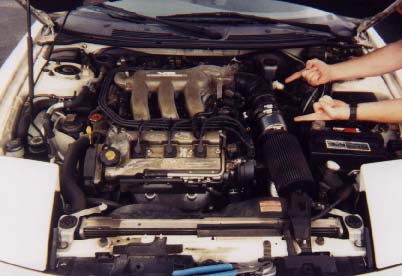
BTW, this is NOT the final picture. The little yellow blob my friend is pointing to is not an Advil. It's a fram fuel filter that was plugged into the hose that was originally stuck into the stock airbox. The other hand is pointing to the extension pipe so that the air filter would fit along with the air duct and the airbox. The airbox did make a difference on the dynamometer, check out the dyno link above for a scan of the chart.

Yes, the air box is finished. And finally here's a picture. Notice the catch basin helping to keep warm air away from the filter. Does it do much? Probably not all that much. At least until such Time that I get my hands on an Akimoto, when I can finally seal up the intake box. But I'm not eager to do that right now. Just more Time and money to spend. We'll see.
03/31/1998: I looked into getting an Akimoto filter from a local performance shop for future mod reasons, but due to their absolutely miserable customer service (One guy sat on his ass the entire Time I was there, staring blankly until a cute girl walked up, another engaged in "wassup, homes" conversations with local friends) I walked out of there pissed and empty handed. Well, actually, I walked out with my 3 hundred dollar bills intact in my wallet. They had Hellas as well, but they've already permanently lost some business. Dicks. I guess I wasn't cool enough or something, not looking either like some shaved headed baggy pants wearing Integra punk nor some slicked up pseudo-suit wearing GQ BMW preppy geek.
03/30/1998: Well, after spending several hours messing with the engine bay, I came to a couple of conclusions:
1. It isn't gonna be pretty.
2. I had to "modify" a lot of underhood stuff.
On Saturday morning I hose clamped the K&N to the air sensor, basically, "prepping" the engine bay to accept the modified "air box." I had to slightly relocate what I will call the "radiator fill cap" which is attached to the radiator by several hoses and two screws. This had to be shifted a bit to clear the large air box. The only necessary mod was to cut a rubber hose that connects it to the coolant reservoir. Knowing Ford, if I ever want to replace the rubber hose, they'll charge me like $57.99, plus tax.. :\ Also, the starter had to be slightly modified. One of the leads connected to the starter was slightly shaved so that it could fit at an angle, allowing better clearance for the bottom of the airbox. The airbox itself was cut in many spots to avoid intruding into space that didn't exist for it. The final realization is that if I want the airbox, I will need some kind of extension tube between the air sensor and the filter itself if I want to seal the K&N filter into a box. Not too big of a deal, but damnit.
In any case, on Sunday I positioned the dryer ducting into the car anyway. Right now it just blows air onto the filter, hopefully giving me cold air at higher speeds. It'll do for now until I track down the final parts I need. At the very least, the car already has a much deeper rumble as I get up to speed. Sounds more aggressive than stock, but will it pan out in performance? I won't do the GTech Pro test until I complete the whole ram air system.
Cost Analysis
I Spent:
$60 bucks for the filter at a local performance shop.
When:
Late 1995
Expenses:
About 20 dollars, conservative estimate for catch basin and a dryer duct. Probably another 10-20 dollars for stuff like hose clamps and other miscellaneous items.