Tokico Illuminas
Tokico Illuminas:
Before and After
Last Update:
[Back to PGT Main Page]
Go to cost analysis
Turns out I really needed the new struts, as the stock ones were useless. Installed them mid-may '98. I also needed to rent some tools to do the install, which ran about 40 bucks. The cost is included in the final tally.
BEFORE:
The stock shocks started going out at around 35,000 miles, but I didn't really pay attention. By 45,000 miles, they were really starting to bother me. When Eddie Wu made the offer of selling these awesome 5 way adjustable struts for a mere 125 each, I just couldn't turn it down.
AFTER:
I scanned in some pictures. They're not really a "before" and "after" set of pictures. After all, the only real visual difference is the white paint on the struts instead of the stock black. People with attention to detail will notice the bit of white peeking out from under the wheel wells. Other than that, there is no way to tell they're not stock.
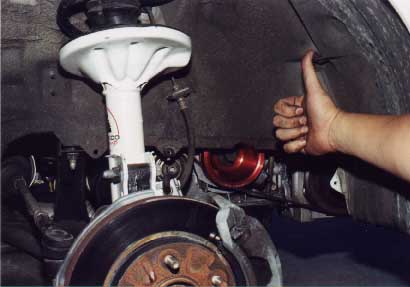
Here's a nifty picture of the Tokico Illumina next to the Unorthodox Underdrive pulley. Just in case you were wondering, this is the right front wheel well with part of the well cover removed so you can see the pulley. Yes, that is my hand. Yes, my hand is very dirty. No, I did not just walk out of the bathroom. Yes, I had a bar of Lava soap in my pocket, I wasn't just happy to take the picture.
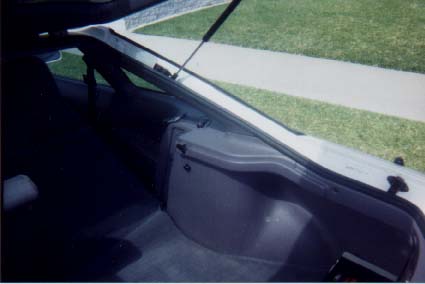
The first picture shows a rear interior panel. Directly underneath the pictured panel is the adjustment knob for the Illuminas. You have a couple of choices when it comes Time to the rear strut settings:
1. Leave the panels off. If you do that, the appearance wouldn't be remotely stock, which goes against one of the tenets of my Methodology. This method isn't even an option. Not to mention it looks crude.
2. Set them once, leave them alone. If this was your choice why bother getting the Illuminas. Save yourself a couple of bucks (like $80) and get non-adjustables. Sheesh.
3. Cut small holes in the panels. There is at least one list member who has done this. Without pictures of his install, I have a hard Time figuring out how he accomplished this. In any case, probably the easiest way to adjust the struts.
4. Remove the whole rear interior panel. The small pictured panel is screwed into the larger interior trunk panel. Removing the side panel requires that you remove the rear trunk panel. A very involved process. Not the best way to go about this. Heck, it's the hardest.
5. Modify the small panel above the strut. My simple solution was to slighly modify (i.e. cut and hack) the small panel so that I could easily pop it on and off. By doing this, the whole process of dialing in the two rear struts takes about 5 minutes if I'm quick.
Stay tuned for these nasty, blurry pics, but like I've said frequently, my photography (and a disposeable camera) sucks.
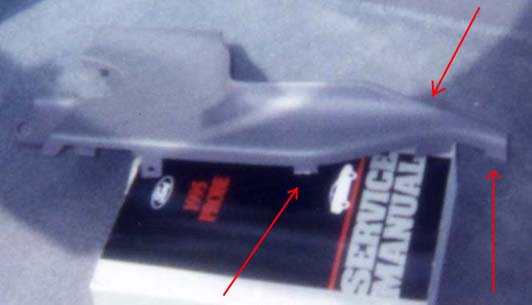
Here's a pic of the panel and the pieces that were hacked off.
I cut off a couple of screw down tabs, but it shouldn't adversely affect the integrity of the panel. I don't screw this down, I just pop it into place. The two bottom red arrows point to the two tabs that were cut down to roughly 45% of their original length. This gives enough length for the panel to stay in place but make them short enough to be easily installed and removed. There is a fairly thick, white, cylindrical piece of plastic that's epoxied to this panel in the back as a bracket. I just snapped off the entire piece instead of just the peg portion so I could glue it back on if I ever want to secure this thing again (the upper red arrow points to the relative spot where the white cylinder is glued onto in the back of the panel). If you need more specific instructions, drop me a note.
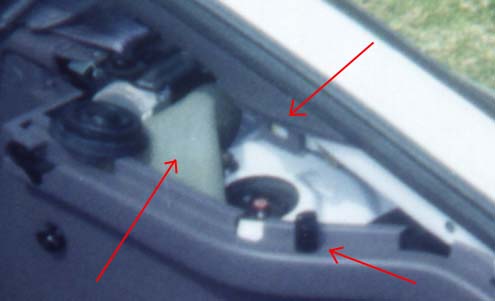
Here, you can just see the top of the Tokico strut. The little red blob is the adjustment dial. The red arrow in the middle indicates where a tab fits into another panel (this tab is not removed. The red arrow on the left points to some sound deadening material that is pulled away from the strut top. The material is held together with some staples which I removed and gives me easy access to the strut. The red arrow on the right points to the rubber boot which fits over the top of the strut. I always keep the four boots on the strut tops when I'm not adjusting them for obvious reasons.
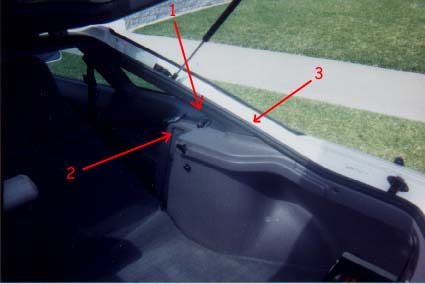
This is an overview of the process.
1. I tilt the rear seat forward to make removal/installation easier. There is a little panel where the seat belt goes into the body that needs to be moved away. Under that panel is normally one of those little "push in" expandable, uh, screw-like things (duh) that holds the panel. For my use I left it completely out. You don't really need it and it's just one more thing to keep track of or lose. When installing the panel again, there is a little plastic tab which slides into place when fitting the panel. Make sure it goes into position.
2. I pry the panel off starting at this point. Much easier than trying to pry it up by the skinny part toward the back of the car. This is also the last part that snaps into place when I install the panel (skinny part goes in first).
3. Back end goes in first when installing and make sure to mind the metal tab here as well when positioning the panel. Also, mind the weatherstripping and make sure that the panel ends up sitting under it.
Well, that's it. Nothing else to see here, stranger. Move along.
Cost Analysis
I Spent:
$550, 500 for the springs and 50 for the shipping. Probably could have gotten the shipping a bit cheaper, but I slightly overestimated the cost. No big deal.
When:
May 1998.
Expenses:
Rented tools, a spring compressor and a torque wrench for 32 dollars. In hindsight, I should have just bought the Torque wrench, as I found one identical to the one I used for 20 bucks at a local Pep Boys.